Pages

Sunday, November 7, 2010

Hatch Day is Here


Well three little balls of fluff jumped the gun and hatched yesterday, and I woke at 5:30am by Peggie whining at the foot of my bed, to find another freshly hatched in the incubator. I went back to sleep only to be woken up in the same manner at 9am, with a second out it's egg. It was absolutely fascinating watching them push their way out of their shells and bumbling around in the incubator drying out.

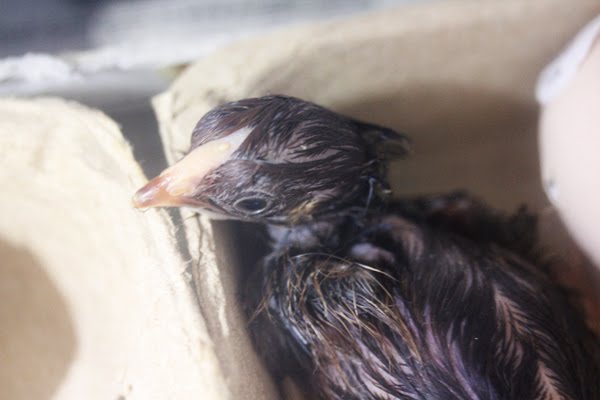
As of 9pm I have 11 baby chickens! Nine are already fluffy and in the brooder box, and two are still in the incubator, as they are not yet dry and fluffy enough to be moved.

I have 5 eggs left in the incubator, 3 have started to hatch, but two aren’t showing any signs yet but that doesn’t surprise me as the day 17 candling showed two that might have been dead in the shell. I have a feeling the rest will be out by tomorrow.

Saturday, November 6, 2010

Day 20-Hatching has started


Well today is day 20 of the eggs incubation. They are due to start hatching tomorrow, so imagine my surprise when I look in the incubator this morning to find, not one, but THREE eggs have pipped!

Pipping is when the baby chick breaks a hole in the shell and membrane of the egg to start breathing and then once they have gotten used to breathing air with their lungs, they will start to chip open the egg to emerge into the big outside world.

It can take up to 24 hours for the chickens to emerge from their shells, so watch this space for more updates!

Friday, November 5, 2010

Day 17 Candling

Well the eggs are coming along nicely, only a few more days to go!
I did another candling to see how the development was going. All but two are going well. The two I’m not so sure about had a lot more yolk visable and weren’t as dark as the rest. I couldn’t see any movement either, so they are probably dead in the shell. The eggs will stay in the incubator until hatch day, just in case.
Dead in shell[?]. I can’t see any visable chick shape, but can still see blood vessels and a lot of the yolk.

Well developing egg. The light section on the right end of the egg is the air sac.
The other possibly dead in shell. Its a real pity about this one if it’s dead, as you can just make out the chick inside. It’s head is in the bottom left corner of the egg with its beak pointing downwards.
Tomorrow is the last day to turn the eggs before leaving them until they hatch, which should be Sunday or Monday. Hopefully the next ‘Chicken Update’ will include some photos from the hatch day.

Sunday, October 31, 2010

Garden Comparison

Its been fairly rainy the last few days, so I have been looking through my photos I have been taking and was gobsmacked at how far my garden beds had really come!

The first two photos are comparisons of my current two beds. The top photos were taken at the start of this competition [Sept 5th] and the bottom photos were taken today [31st Oct], which is approximately 2 months apart.

The transformation is quite amazing! You don’t really notice the difference each day, as things change so slowly.

In other news, my spinach pot is doing awesomely, and we’ve had a few harvests off of it already. I have planted another lot of seeds in the green house so I can continue cropping the spinach for a much longer period of time.

And more of my corn as come up!! WOOHOO! Finally some decent sucess with corn. I am seriously so happy. Both me and my partner love corn, and it was the one veggie we definitely wanted to grow. Typically it is the one thing I have had the most trouble with growing!

13 Day Candling

Only 8 days to go!!

I did my second candling of the eggs in my incubator and also did my first chuck out of dud eggs. I threw out 5 infertile eggs and 3 eggs with blood rings.

What I am currently left with is 16 viable and well developing eggs. I have 5 Gold Laced, 4 Silver Laced [show quality] and 7 Silver Laced eggs all developing nicely.

As I candled them, I could actually SEE the chicks inside moving around!! I will try to video the next candling [which will take place on day 18, which is the 4th of Nov] so people can see the chickens moving.

Compared to last candling, the eggs are so much darker.

Sunday, October 24, 2010

Day 7 Candling

Tonight I candled my eggs for the first time tonight.

Candling allows you to see inside the egg to see the development of the chick inside. I use a super bright LED torch and a toilet roll [with paper on it] to balance the egg on and focus the light beam through the egg.

Out of the 24 eggs I have:

4 infertile
1 possibly infertile
3 bloodrings [started developing but died]
1 possibly developing
15 developing

A fertile and developing egg. You can see the veins and the developing chick [blob] I could actually see the little black blob moving!

An egg with a bloodring, means the egg started developing but for some reason stopped.


This egg is possibly infertile, but it is hard to say as the rest of the infertile eggs were much lighter in the centre but there doesn’t appear to be any veins or development going on.

Another fertile egg, you can see some veins in it, but I’m not sure this one will make it to full term, as the shell’s pores are so large, but I am hoping it will.

Monday, October 18, 2010

Incubating Eggs!


Finally Paul has said I can get chickens...it's only taken 18 months to convince him! I picked up my incubator on Friday and set it up to allow the temperature to stabilise. The eggs need a constant 37.7 degrees to hatch.

On Saturday, I took a lovely drive up to Hahndorf to meet the lady selling me 2 dozen fertile eggs. I also got the chance to meet the chickens who laid the eggs. Gorgeous birds!

I bought 9 Gold Laced Wyandotte eggs and 15 Silver Laced Wyandotte eggs [6 of which came from show quality birds] and let them sit for 24 hours before putting them into the incubator.

They went into the incubator around midday, after I labelled each egg with a number, date of lay and colour. So if all goes well, I’ll have fluffy baby chickens on the 6/7th of November.

In gardening news, my corn has yet again rotted. Time to buy new seeds I think.

Wednesday, October 6, 2010

Paper Seedling Holders

Yesterday I started to transplant all my tomato seedlings from the seed raising trays into tubes [I use toilet paper rolls]. Unfortunately I ran out of toilet paper rolls, even with three men in the house!! So I had to come up with some other way to make biodegradable seedling tubes without forking any money.

I came up with this. Paper seedling tubes. Made from old pieces of A4 paper [old bills, pamphlets, etc], they’ll biodegrade quicker than the toilet tubes once placed in the ground. And you don’t need glue or tape to hold them together.

They’re a little fiddly to make at first but once you get the hang of, they’re quite easy.

Fold a piece of A4 paper in half widthways. Unfold and fold in half lengthways. Leave folded lengthways.

Fold from the point on the centre crease where the halfway crease is, diagonally from corner to corner. Unfold the last fold.

From the end of the centre crease, fold the paper inside itself on the diagonal fold line. What you should have is a piece of paper with a taper starting from the centre of the length going to a point at the other end.

Now roll the paper into a cylinder shape. Then insert the point between the folds and coil it inside until none of the tapered section is showing. It takes a bit of practice to get it to stay there, but it will.

I have found you don’t need bottoms in the as long as you pack them well with soil and place them in a tray [mine are sitting in a cardboard tray we bought croissants in].

Wednesday, September 29, 2010

My New Goals-Towards Self-Sustainability

I'm taking part in Yates Spring Veggie Competition. Growing these vegetables for the competition has really got me thinking about sustainable living again. I frequent a self-sustainability forum, where I have been learning a great deal about gardening and other things including soap making and aquaponics.

I have decided to get my act together and get cracking on a decent sized veggie garden to hopefully get us on our feet to being self-sustainable in the fruit and veg department. It’s going to be an interesting learning experience.

Over the last year I’ve been putting it off, wanting to wait until we have our own place, but that’s not going to happen any time soon. I asked myself what was stopping me, and apart from being lazy, there really isn’t anything else.

I have unofficially taken over a section of the yard [the house belongs to my partner’s parents] to build my new beds, as my other veggie bed doesn’t get much sun, and there is only TWO outdoor taps on the whole 1/4 acre, and neither are near the existing bed. So naturally I forget to water it. I’m going to turn it into a place to dump clippings, weeds, scraps, manure, etc to break down to a usable state on the new beds, once my new beds are in. Plus I’ll continue growing my potatoes there, as they seem to be happy there.


This is the space I’ve taken over, it’s between the main house [on the left] and the room where me and my partner live [right].

Currently my plan is to have a bed that runs along the path next to the main house and do a right turn and run along the fence [I’ve already started that part of the bed and planted peas and beans] and then have an ‘H’ shaped bed taking up the rest of the room [the storm water pipe sticking up in the centre will end up in the cross bar of the ‘H’ shape]

.

The apricot tree finally carked it this year, hence the tree stump in the photo, which my OH had great delight in knocking over with our 4wd [boys and their toys!]. Stupid people who put it there didn’t take it out the pot, so it ended up mainly root bound with a few roots that managed to escape the pot. Not that the fruit were any good last year anyway. Gives me an excuse to get more fruit trees now!

Friday, September 24, 2010

No Dig Beds, Surprises and Helping Paws


Today was sunny. I love sunny days. Finally, Spring feels like it is actually here-ironically the day after the Spring Equinox, which produced a beautiful full Harvest Moon last night.


I was relatively productive in the garden today. I tackled the weeds in the main veggie bed which I have been procrastinating long enough for all the weeds I had pulled out to be replaced. I also dug some more of the clay out of the bed and broke it up, so more of the patch has a decent depth. I am considering doing a few layers like in no-dig garden beds, on top just to give it a little more depth for plants like carrots.


In amongst the weeds, I have two stacks of two tyres which I grow potatoes in. I was pleasantly surprised to find a few handfuls of small spuds in one. I didn't realise any had grown this year, as I hadn't planted any. They must have grown from a potato I missed last year. I will replant some of the ones I dug up today, as they are too small to eat.


Once that was done, my dogs thought it was time to help. By incubating my potato stacks!!


I made a quick no dig bed on the other side of the fence where I have my smaller patch. It isn't a typical no dig bed, as I didn't have any straw or newspaper. It consisted of a rotting towel I found in the garden to help stop weeds coming through, half dead grass weeds that were pulled out a few days ago, some newly weeded grass and soil from my main veggie patch. Still need to get some straw to mulch the top.


Within this I planted Snake Beans and Telephone climbing peas, both sides of the fence. Following basic companion planting guides, corn and pumpkin will also go in once the seedlings are grown. The corn will go left of [behind] the fence and the pumpkin will go right of [front] the fence. This will allow the pumpkins to spread forward across unused ground.


My zucchini seedlings have also been getting too big for their container in the green house, so I transplanted them into a hardening off pot made from an old aquarium, lined with skoria for drainage and soil from the garden.


The bark on top was just to shield them from the sun earlier in the day, as they were drooping like mad after I moved them. But they have almost all completely perked up again.

Sunday, September 19, 2010

What I Have Got So Far...

Well since I have already started growing things for this year, I have plenty of seedlings in my greenhouse already. I planted a whole heap last week, and some more today.
So Far I have planted:
Tomato: Oxheart, Roma, Cherry, Tigerella, Grosse Lisse, Assorted Diggers Seeds
Corn: Honeysweet, Bicolour
Zucchini: Blackjack
Pumpkin: Butternut, QLD Blue, Unknown
Capsicum: Colour mix
Peas: Telephone
Beans: Dwarf Climbing, Snake
Baby Spinach, Purple Carrots, Watermelon, Rockmelon, Broccoli, Sunflower, Brown Onion, Cucumber, Basil, Oregano, Thyme and Shallots


I have a friend of mine who is going to teach me how to preserve and make sauces, along with many other goodies! So that is why I am growing so many types of tomatoes. I am hoping between us we will have enough room to grow them all!


Once I get around to it, I will be making proper trays for the green house, which I will use to grow seeds in and the baby spinach in for the entirety of its life, instead of planting it out in the garden. Snails always seem to eat my spinach before I get to it!


I also hope I have luck growing the dwarf beans this year. Last year they half rotted away before sprouting and the other half rotted just after sprouting. I was very disappointed with that. It's not looking so good at the moment as the Snake beans have already come up, and none of the dwarf beans have. But here's hoping they are just late bloomers!


A New Start

Well, it seems I have neglected this blog for a long while. I will try to remember to update more often, but honestly over the last year, I haven't really done any gardening. And the garden is really showing it! There are weeds everywhere!! My veggie patch has been consumed by weeds, to the point you cannot see it!

Recently I was sent a link to a competition run by Yates. It is a spring veggie growing challenge, and I am taking part in it. If you are interested, here's the link to my competition blog: http://www.yates.com.au/vegie-challenge/spring-vegie-challenge/gardeners/Ravyk . Feel free to vote on the posts and leave comments. Most of the stuff on there, will also be posted here, probably with more pictures.

Doing the competition is kick starting me back into gear, and hopefully this year I'll have the chance to get a fully functioning veggie garden up and running.

Saturday, January 23, 2010

Broken Glass Jelly

A thread on the Dogz Online forum asking for help with gelatin seems to have led to a lot of people making Jelly, in this case Broken Glass Jelly. Basically all it is blocks of set jelly set into a gelatin and sweetened condensed milk mixture. Once set it is then cut into blocks.

I decided to do mine in a mould, but I took the jelly out too soon and it kind of went splat. But even though I served Paul up with a bowl of wobbly, multi coloured mess, he declared it delicious. I am going to try again once this lot is finished up, and try to get it looking a lot nicer and possibly actually staying in nice cut pieces.


Anyone who wants the recipe for the Broken Glass Jelly, head to here. Recipe It has step by step instructions with pictures, thanks to a member of the dogs forum.

Thursday, January 21, 2010

Roadside Finds

I honestly love hard rubbish days. You can find some really amazing things that people chuck out. I've picked up little metal cabinets, 50 arrows for archery, solid wooden stools, basket balls...but my latest find would have to probably be the best find I've ever made.


They appear to be low dressers, with the fronts completely done in inlaid mother of pearl designs. I did have to fight with Paul to get him to let me bring them home, but I stand by my reasoning that he got the fridge...I get the dressers! They need a bit of fixing up though, but they will look awesome once finished. The detail in the doors is amazing!


Unfortunately though Paul hates them and won't let me keep them. *pouts* Which means I will sell them once I've restored them.

It's going to be interesting restoring these pieces...I've never really done this kind of work before. The mother of pearl is in reasonable condition which is excellent, except for the handles, where most of it is missing. Time to browse the op-shops for cheap knick-knacks with mother of pearl in them...